In the present scenario, people have become more concerned regarding the web security as more and more work is done online. If you are one among them and having a WordPress blog, then you landed at the right page. Yes! You heard it right. We will discuss about Google’s 2-factor authentication in this post to add an extra security layer to your WordPress blog.
All you need, is to have a touch-enabled device, download the Google Authenticator (Blackberry, Android or iPhone) and install this plugin. Let’s discuss it in detail:
Know about Google’s Two-step Verification:
Usually, to log into the WordPress dashboard, we require an username & password. It is good if you own a strong password, but it can be better by making your WordPress login more secure using two-factor or two-step Google authenticator. By activating this 2-Step authenticator from Google in your WordPress site, you will be asked to input a six-digit number once you enter your unique username and password. In case, you fail to enter this six-digit number even if you have given authentic username & password, then you will not be able to login.
This plugin will make your website stronger against devastating security attacks even your password or username is revealed, the attacker cannot intrude the site without six-digit unique code.
How to link 2-step Google Authenticator to WordPress website?
To start with it, complete the download and installation process of Google Authenticator plugin. Then, follow the below-mentioned steps:
Activation Process:
Now, it is time to activate it, just press go to Users > Your Profile. Tick in the Active check box for activating Google two-factor authenticator in WordPress.
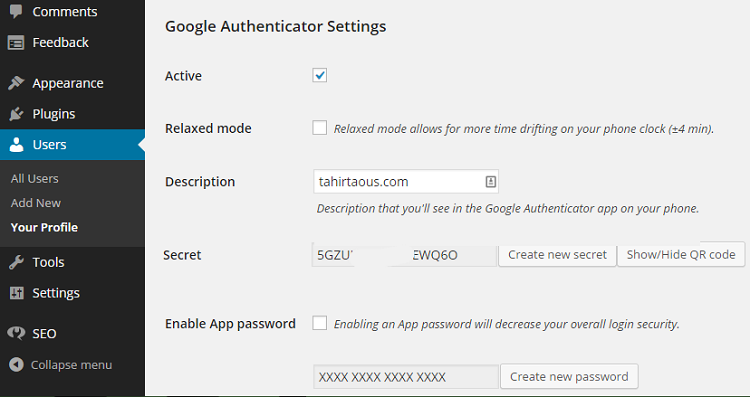
Further, you require to alter the description, so that you can identify the site’s entry over the Google verification and display the QR code.
Opting Relaxed Mode:
Though the given passcode for Google gets expired after one minute. But, you can extend its use by using relaxed mode that increases its limit by 4 minutes. This is recommended only for the people who type quite slow. People with good typing speed can do it in the given one minute as the code is only of 6 characters.
Using Description Along With Secret Key:
Here, the description plays the role of your account in the Google verification app. And, the secret key is asked for, when you do not use the QR code.

Note: People who use iPhone will not be able to put space in their description. But, in the WordPress blog, the users need to use the key in order to input the information in app on their own. This is mandatory as without putting spaces the QR code will not work.
Go with App Passcode:
It is required only in the case if the user is going along with XML-RPC (remote publishing) in the WordPress blog. This is directly associated with Windows live writer or iOS app. Keep this in mind that this process will diminish the overall safety of the website. But, if you prefer remote publishing, then you can continue to use it just by setting an app password.
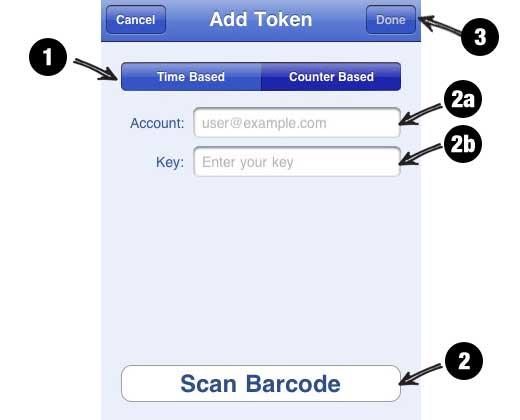
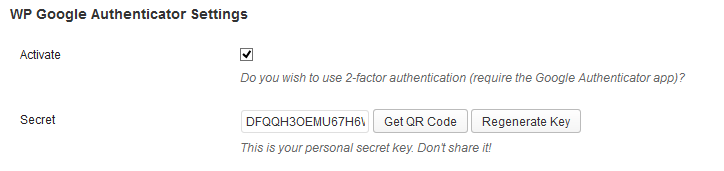
Once you have configured the WordPress part, it is time to click on the icon in order to add a new account. Page like this will appear:
Make Use of Single Time Password:
This is better to go for one-time or a time-based password. This passcode offers improved protection against any sort of phishing or prevents keyloggers from intruding the security. It is because every code remains legitimate only for a short span of time. In case, counter-based passwords are used, then the user requires clicking on the refresh button placed next to passcode in the Google two-factor verification app.
Bar Code Scanning:
In case, you do not have spaces, then it is a good idea to scan bar code. You just need to make a click on show bar code button in your WordPress site to view the QR code. People who are having spaces in their description, they can simply use their description as their account name. Enter the secret key which is there in the admin panel of WordPress. Press the done button.
Now, when you are required to the login page, you will find a two-factor verification step that demands for Google authenticator code.
What are the special areas of Google Authenticator?
- Once this app is installed in your WordPress website, it boosts the security of WordPress login page.
- It is easy to be enabled for every user solely.
- This allows the users to set any display name with which he wants to appear in the Google verification app.
- Admin can compel the users to opt for the 2 factor authentication (and keep a check on the number of login without enabling two-way authenticator). All the users might be compelled to use the Google verification or for specified roles, such as support app passwords (along with the access log).
- Users who have not set up 2FA, they get a reminder regarding this along with a warning that pops up on their dashboard.
- It is feasible for users to trigger a fresh secret key anytime
- Enable discrepancy of clock (mins +/-)
- Admin reserves the right to quash the key of any user anytime.
- If a user keeps on logging and logging out many times without opting two-factor authenticator, then admin may reset the counter.
- For the security purpose, one-time passcodes are stored and hashed in the database to refrain its multiple use (if any attacker intrudes).
- Recovery code being in case the user won’t be able to use the app.
Deactivating Two-factor Google Authentication:
Though it is not recommended deactivating two-step Google authenticator, as it is less secure, even you are having a strong password. We are sharing it just for your learning. To deactivate, you just need to visit your two-step verification page.
You can clearly view this app is enabled, and you just need to press the disable button. This will ask you to input a code to validate that you are having access to the specific device that you genuinely used to enable two factor authenticator. If you go along with an app, then open it for entering the code which it provides. And, in case, you are going along with SMS, then the code will be sent to you. This code will be distinct from the one which you used for logging into your account. Backup code can also be used for this particular step. After inserting the code, two step Google authenticator will no longer be protecting your account.
You lost the device! What to do?
You may lost your device accidentally. Now, you just need to eliminate the authenticator app or lock it out of your account anyhow. The only trick to reach to your account is the backup code. For using the backup code, trigger the login details. Now, you will be asked for the login password, insert the backup code as an alternative. Note: Backup code is considered legitimate for a single time only so stay careful while using it.
Conclusion:
Thus, this was all about how you can set up Google two factor authenticator. So, follow these simple tricks and empower your WordPress blog with better security by refraining phishing and keyloggers.
This article is contributed by Bryan Lazaris, an expert WordPress developer associated with HireWebDeveloper. Other than developing website, he also has keen interest in writing. He gives the best tips regarding WordPress plugins through his informational write-ups.