WordPress, the most popular content management system (CMS) is mostly used for blogging and accounts to nearly 23% of total websites on Internet. Being the most popular web publishing platform, WordPress is also among the favorites for hackers and spammers. WordPress itself is quite secure and if any loop holes are detected, they get patched in their very next release. So the first thing you should always remember is the installation of an updated WordPress.

The default configurations used in WordPress installation is what gives hackers to try hands on WordPress powered sites. The default login page can be located in domain.com/wp-login.php or domain.com/wp-admin that gives hackers a chance to use trial and error method, also known as, brute force attack that uses many possible combinations of username and password to get access. Again the default configuration of WordPress uses administrator username as “admin”, which simplifies things more for hackers. But you can give a quite tough challenge to brute force attackers if you change the default username and use complex passwords. And that’s not enough; there are many other security measures that should be taken care to secure a WordPress site. Let’s take a look below:
Web Hosting Services
Web hosting is a place to store WordPress files and database that can be accessed online. So it is imperative to wisely choose a web host provider. But, before purchasing any space, make sure to inquire about all the security features offered by your web host provider. Also, do check the reviews online or ask on social media about the efficiency of the services claimed by the hosting provider.
Isolation
Keep in mind, it is not always you at the fault, sometimes web hosting server may get compromised and this case is more common with shared hosting.
There are multiple of sites hosted on same shared hosting and if any one of it gets hacked or infected, it may affect multiple sites on the same node as there is no firewall between them. The most popular shared hosting providers implement isolation techniques to mitigate the risk of spreading the malware from one site to multiple sites. So, you should discuss about isolation with web hosting provider before hosting your site.
Automatic backup
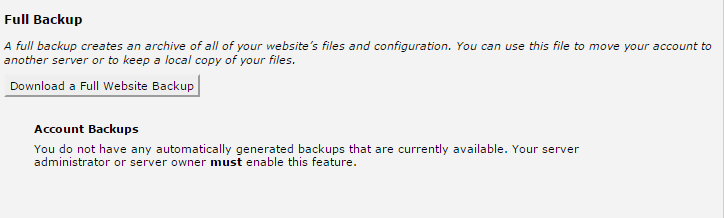
Automatic Backup is the must have feature for any web host. Most of the hosting providers do offer the feature for free or with a paid plan. Backup is needed to restore the site to its working state, if infected with virus or affected by hacking.
If your hosting provider doesn’t offer you an automatic backup, you can try out the below WordPress plugins to take regular backup for free.
- BackupWordpress : This will help you backup your entire site and database in simple steps in your suitable schedules. After backup, you also get an option to have those in your email.
- BackWPup : This plugin gives backup of your complete installation, optimize and repair your database and help you store it in Dropbox, FTP server, cloud by only one backup .zip file.
- Duplicator : This is another backup plugin which helps you in copy, move or migrate your site from one location to another. This gives you an advantage of developing your site locally and later move to the production server.
- blogVault realtime backup : This is one of the best backup plugins that provides daily automatic backups for your site. It backups all the data in first run and then backup only the data that changes since last backup. This is truly amazing as it helps in reducing the server load and maintain the backup space.
DDOS Protection
Few other hacking techniques target servers, one of the most common type is DDOS attack. In this case, the hacker will flood the server with frequent requests that may crash the server making it unavailable for real visitors. To overcome this, few hosting providers have an integrated protection against DDOS attacks. If your hosting provider doesn’t implements any security measures to protect the servers from DDOS, you can use CloudFlare service, which also provides free CDN service.
Server Application
Before purchasing a hosting space, make sure you inquire about all the security features provided by the hosting provider. If the applications used by server are not regularly updated, it can be the biggest threat to your website. Or atleast make sure the PHP and MySQL used by the service provider should be the latest and stable one. Apart from all the listed security features, hosting provider should be having malware scanner and 24X7 quality support.
Installation Settings
Most of the web hosting providers offers 1 click WordPress installation that will install WordPress with its default configurations. As you know the default configuration is same for every installation, it again becomes more prone to hacking; so changing the default configurations will make hacker’s task difficult and give more security to the site.
Security Keys
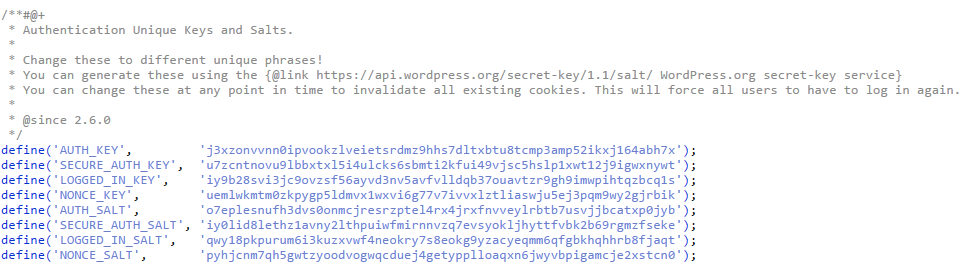
The most important file of WordPress is its configuration file (wp-config.php) and can be found on root WordPress installation directory. The file contains database information, basic configuration and security keys. Security keys, also known as secret keys, are used by WordPress to encrypt the information stored in user’s cookies. Please note, by default, WordPress does not set any security keys. You can check wp-config.php file to confirm if the security keys are set. In wp-config.php, you can find the codes as below:
define('AUTH_KEY', 'put your unique phrase here'); define('SECURE_AUTH_KEY', 'put your unique phrase here'); define('LOGGED_IN_KEY', 'put your unique phrase here'); define('NONCE_KEY', 'put your unique phrase here'); define('AUTH_SALT', 'put your unique phrase here'); define('SECURE_AUTH_SALT', 'put your unique phrase here'); define('LOGGED_IN_SALT', 'put your unique phrase here'); define('NONCE_SALT', 'put your unique phrase here'); |
If the keys are not set, you can generate it with WordPress salt Generator and paste it in your wp-config file.
File Permission
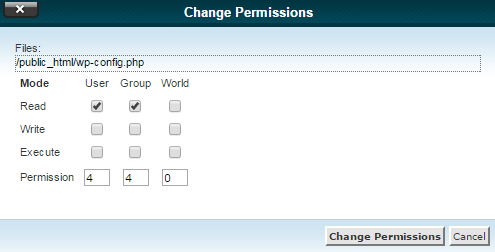
By default, all the files in WordPress should have 644 permission and all directories have 755 permission, which is quite secure. Lower the number of file permission, the better secure your file will be. You can also use 400, 440 or 600 file permission for wp-config file that makes sure that only you and web server can read the configuration.
Deny wp-config access
WordPress configuration (wp-config.php) file is the most important file of WordPress and any unauthorized access to this file may result in great loss. We can modify our server configuration to deny any unauthorized access to wp-config.php
Apache
Apache server user can put the below code in .htaccess to block unauthorized access to configuration file.
<files wp-config.php> order allow,deny deny from all </files> |
Nginx
Nginx server user can put the code in server block of nginx.config file to deny unauthorized access to WordPress configuration files.
location = /wp-config.php { deny all; } |
Note : After implementing the changes Apache user will get 404 not found error while nginx user will get 403 Forbidden error for wp-config.php page.
Default Username
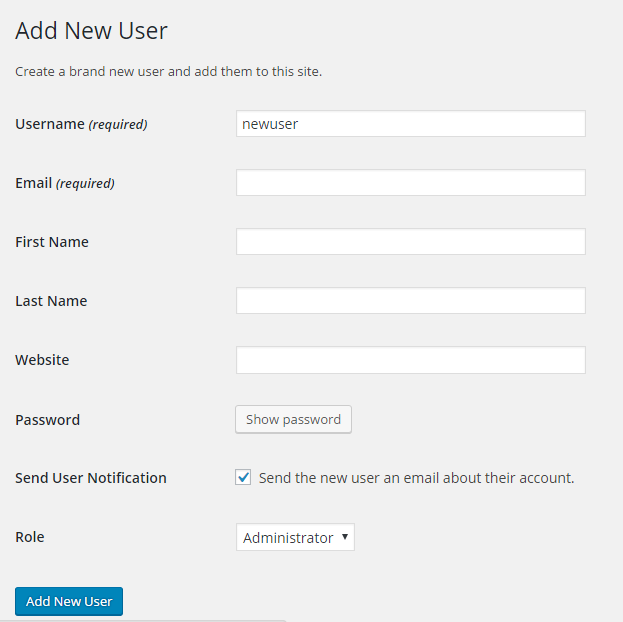
You already know that default username for WordPress installation is admin which is more exposed to attack. So definitely go for a new username and the easiest way to modify is to “create new user” in Add New User section and assign Administrator role to the new user. After assigning Admin privilege to new user, you will be able to delete the previous user with username admin or for more security assign subscriber role to admin user.
The above method is the simplest one; you can also use phpMyAdmin to change the default admin username to something else. But before performing any changes in database, it is always advisable to take a backup. Now login to phpMyAdmin and select the database that your blog is hosted in. If you are not sure about the database name, you can refer wp-config.php file. Navigate to wp_users table and edit the row where user_login is admin. Change admin to different username or use the below sql command in SQL window-
UPDATE wp_users SET user_login = 'newusername' WHERE user_login = 'admin' |
Note : Edit wp_ with deafult table prefix of database and newusername with the new username you want to change.
Table prefix
WordPress installation, by default, uses wp_ as table prefix that means the entire default table name will be starting from wp_. This is one of the reasons that most of WordPress blogs are easily targeted to SQL injection. SQL injection is a technique where hacker injects SQL command in SQL statement. Here, changing the default prefix will prevent WordPress site from SQL injection.
But, changing default wp_ prefix is not an easy job; we will show you how to change default table prefix from phpMyAdmin. And before performing any step, do not forget to take a full database backup.
Step 1 – Decide the new prefix
By default, WordPress or script installer can assign wp_, wp1_ or wordpress_ prefix, but all prefix are not safe. You can check your default prefix in wp-config.php file and you can find code similar to below in wp-config file –
$table_prefix = 'wp_'; |
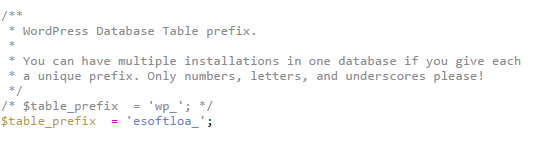
Now change the wp_ to something different. We are taking example as ‘esoftloa_’. Your new table prefix will look similar to below code.
$table_prefix = 'esoftloa_'; |
Save wp-config.php after change.
Step 2 – Change WordPress table names
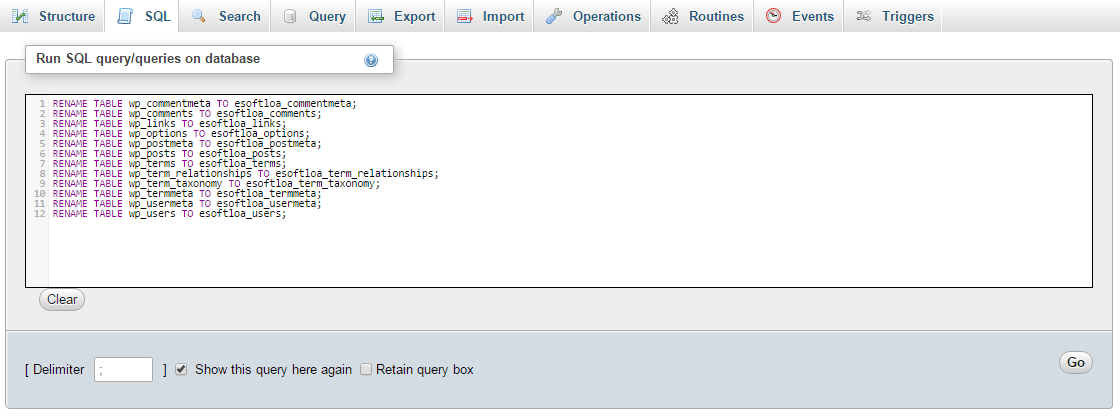
Changing prefix in wp-config file will not change the prefix in database table. You have to change it manually. Login to phpMyAdmin and select the database associated with the site. Navigate to SQL window and enter each command one by one and press go button.
RENAME TABLE wp_commentmeta TO esoftloa_commentmeta; RENAME TABLE wp_comments TO esoftloa_comments; RENAME TABLE wp_links TO esoftloa_links; RENAME TABLE wp_options TO esoftloa_options; RENAME TABLE wp_postmeta TO esoftloa_postmeta; RENAME TABLE wp_posts TO esoftloa_posts; RENAME TABLE wp_terms TO esoftloa_terms; RENAME TABLE wp_term_relationships TO esoftloa_term_relationships; RENAME TABLE wp_term_taxonomy TO esoftloa_term_taxonomy; RENAME TABLE wp_termmeta TO esoftloa_termmeta; RENAME TABLE wp_usermeta TO esoftloa_usermeta; RENAME TABLE wp_users TO esoftloa_users; |
Note : Change esoftloa_ to table prefix chosen by you in wp-config file.
Step 3 – Edit Option table
There are still few things to change to return back to a working state. After changing table name, put the below command in SQL window and enter go button. Change esoftloa_ to your table prefix.
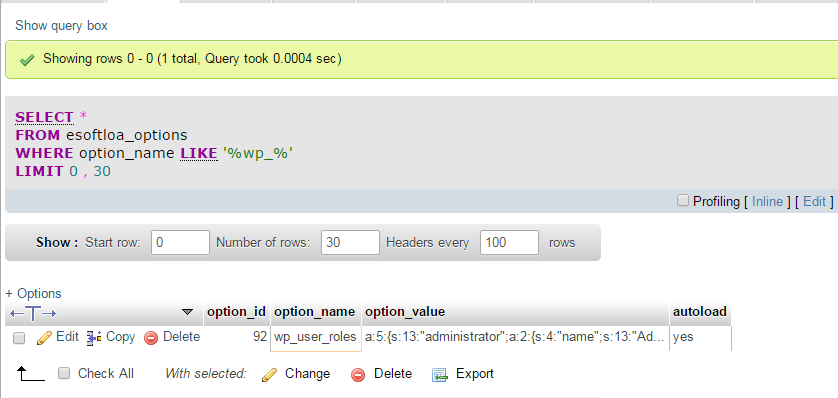
SELECT * FROM esoftloa_options WHERE option_name LIKE '%wp_%' |
You will be getting list of rows, edit each manually by clicking edit button. Replace wp_ to your own prefix for all the rows.
Step 4 – Edit UserMeta Table
There will be few UserMeta fields that will be using wp_ prefix. Use the below command to get all the fields and edit it manually.
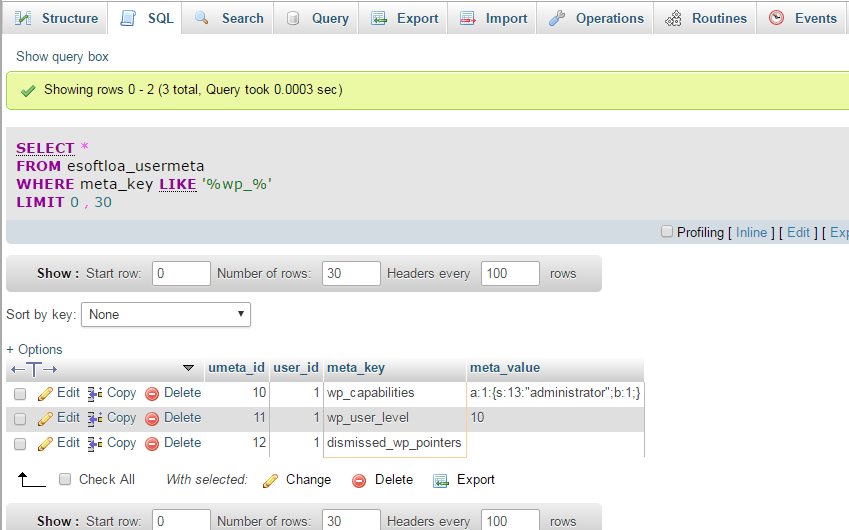
SELECT * FROM esoftloa_usermeta WHERE meta_key LIKE '%wp_%' |
Replace wp_ prefix to new prefix in the result.
And you are done here, you have successfully changed the default prefix. If anything goes wrong hereafter, restore the database and change the table_prefix back to wp_ in wp-config file.
Disable PHP Error Reporting
If any error occurs with plugin or theme code, it may display an error message with the server path. The server information can be useful for hackers to plan an attack. We can manually disable the php error reporting by adding the below code in wp-config.php file.
error_reporting(0); @ini_set(‘display_errors’, 0); |
Now let’s move to its another section and see how to secure your WordPress Login.
Securing WordPress Login
The default WordPress login can be accessed on domain.com/wp-login.php and if you are using default admin username, it will be easier for hackers to perform brute force attack. Let’s check out few security measures that can prevent your WordPress account from getting hacked.
Password Protect WordPress Login
If you are only the one accessing login page or having a small group that access WordPress login page, it would be a better idea to implement server side password protection. Password protection for WordPress Login will provide a double layer of protection to administrator account.
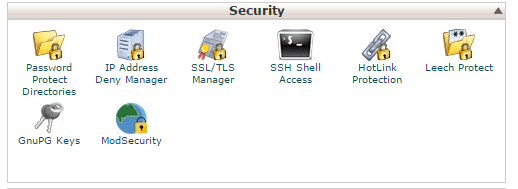
If you are a cpanel user, you can simply click on Password protect directories under Security section in cpanel. Select wp-admin as directory and set username, password and save the settings.
You can also implement it manually by putting a strong password in a text file, rename the file to .htpasswd and upload it on server. For better security, upload the file outside of root directory. For example, upload it one level above public_html by following below steps:
/home/username/.htpasswd |
Apache Server
Paste the below code in a new text file, rename it to .htaccess and upload it on wp-admin directory.
AuthType Basic AuthName "Password Protected" Require valid-user AuthUserFile /home/username/.htpasswd |
Note : Edit AuthUserFile path with your .htpasswd absolute path location.
Nginx Server
For nginx users, before implementing the code; verify that .htpasswd is installed in server. If not, you can install it by below command on Unix server
sudo apt-get install apache2-utils |
Then generate auth file by below command, enter a strong password once asked
sudo htpasswd -c /home/username/.htpasswd |
Paste the below code in server block of nginx configuration
location /wp-admin { auth_basic "Password Protected"; auth_basic_user_file /home/username/.htpasswd; } |
The method has a drawback as it is effective only with HTTPS WordPress sites because the credential with the request are not encrypted by default. Site without SSL certificate can consider using HTTP Digest Authentication Plugin that uses MD5 encryption and works with different types of servers.
Limit Login
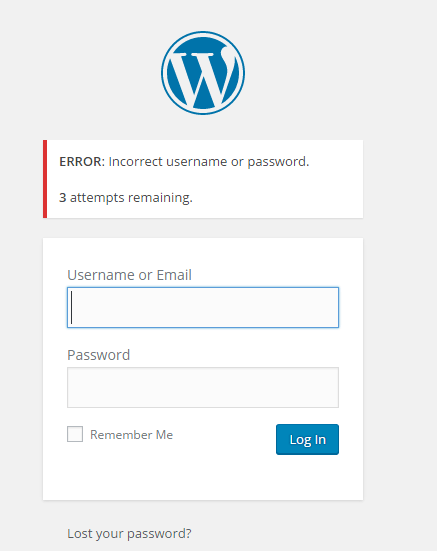
If you have a multi author WordPress site, using Password protection on WordPress login will not be a cool idea. But yes, that can increase the risk of brute force attack. To deal with the situation, you can limit login attempts by using WordPress Plugins.
The below plugins will allow user to take few attempts to login, if user failed to login with given attempts, IP address of the user will be banned for specified time.
- WP Limit Login attempt : It detects attacking bots by captcha verification and limits the rate of login attempts by blocking IP address temporarily.
- Login LockDown : It works by disabling login function for IP address of failed attempts user from a range for certain number of times, and eventually blocks all requests for specified time.
- Login Security : This plugin gives you the feature of recording IP address that has tried several login attempts at your site and you can later block its access.
- Limit Login attempts : This is fully customizable plugin that helps in limiting the login attempts by tracking it through cookies or by way of reaching specific number login attempts.
Hide Login path
Default WordPress Login path is known to both WordPress users as well as hackers and this can create a security issue in WordPress. So changing the default login path will confuse hacker and will increase the security of admin panel. The below plugins can be a help to hide or change default WordPress login page.
- Hide Login+ : With this, you can have a secure and hidden login page that prevents direct access to wp-login.php and wp-admin
- Lockdown WP admin : This plugin will hide the admin and login screen when the user isn’t logged in, and if any attempt is made, it will be redirected to an error page.
- Custom Login URL : This plugin will enable you to customize your default WP login, passwords and hide your URLs without any change in other files.
- Rename Wp-login.php : As its name defines, it will let you to rename wp-login.php or wp-admin, but don’t forget to save or bookmark the URL.
- WPS Hide Login : This plugin is somewhat same as above, it does not really lets you rename the login but it does let you change the login to anything you want, easily and safely.
Two-factor Authentication
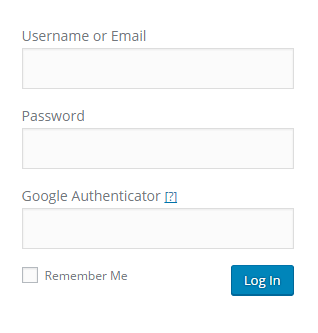
This is another secured way: Two-factor Authentication or 2-step verification method as it increases the protection level of login panel. The solution will help to put an extra level of protection by providing the user with an authentication code that can be received only by user through SMS, call or from Mobile app. You can use below plugins to implement two-factor authentication in WordPress.
- Clef : It will replace the login screen with clef wave that can be synced with clef mobile app. Authentication will be encrypted with RSA public key cryptography.
- Google Authenticator : The plugin will sync with Google Authenticator app that will generate secret one time password. The password will be required along with username and password to login.
- Duo Two factor Authentication : This plugin have similar features as Google Authenticator with multiple way to validate by using one-tap authentication, one time password, SMS or phone call.
Disable XMLRPC
Since WordPress 3.5, XML-RPC support has been enabled by default. WordPress XML-RPC is an API (Application program interface) that gives application developer access to execute methods remotely. An application can use methods to access, add, edit and delete post, media, comments, taxonomies, options and users.
As most WordPress users started implementing security methods to secure login page, hackers started using XML-RPC to initiate brute force attacks. And the solution is disable XML-RPC on WordPress, but disabling XML-RPC may affect few plugins that relay on XML-RPC such as JetPack and WordPress mobile plugin. If you are not using any plugins that require XML-RPC, you should consider disabling XML-RPC.
Apache Server
Apache server users can add the below code in .htaccess file to disable XML-RPC. WordPress XML-RPC page will return 404 error after saving changes.
<Files xmlrpc.php> Order Deny,Allow Deny from all </Files> |
Nginx Server
Nginx server users can implement the below code in nginx configuration to disable XML-RPC access.
location = /xmlrpc.php { deny all; } |
Note : Disabling XML-RPC will also disable pingbacks and trackbacks functionality on WordPress site.
Alternatively, you can also install Disable XML-RPC plugin to disable the WordPress XML-RPC. You can re enable XML-RPC anytime by disabling the plugin.
Other Security Tips
Apart from the above security suggestions, we also recommend to spread some focus on basic things that could lead to hacking of a site. With site security, web host account and primary email security are also equally important.
Use Strong Password
Make sure to use strong passwords that consist of alpha numeric characters as well as symbols. It is also equally important to remember or safely store those strong passwords. You can generate a strong and secure password from a password generator tool.
Reduce Plugins and theme
You should be very selective while installing any theme or plugins. It is always recommended to download them from a trusted source. Don’t install any premium theme or plugins that claimed to be free. Also delete any unused themes and plugins. You should also update core WordPress, themes and plugins as soon as a new version appears on the dashboard.
Perform Security Scan
Few web hosting providers do implement option to perform security scan on server. You can install plugins to perform security scan of core, theme and plugin codes. The scanner will check for any malicious code in core file, plugin and theme.
- CodeGuard : The plugin is actually an automatic backup plugin, but it also notifies user if anything changes in Site code. The site can be restored to previous clean backup if any malicious code found.
- Sucuri : Sucuri Security plugin provide remote security scanner that check sites for any malicious or spam code. It also includes some security tools and website firewall.
- ThemeAuthencity checker : The plugin will scan the theme file and if any malicious code found will be notified to user and a guide to remove the code.
Monitor log files
Log files stores everything that happens on the site including errors and warnings generated by theme or plugins. Auditing log file help you to be updated about the site security and errors. If you feel something is wrong with the site you can check the log files stored in server or can install plugins to audit the logs.
- WP Security Audit Log : The plugin will monitor all the activity on the WordPress site and will notify the user of any change or security issue in the site.
- Audit Trail : Audit trail logs all user activity as well as post and pages changes. It provides functionality to restore any changes made on post or pages.
Install Antivirus and Firewall
Till now we have discussed about server side security, but there are also few hacking tools such as key loggers that can be silently installed on client machine and log everything you do in your computer.
A good updated antivirus and firewall will ensure that the system is free from any malicious tools. Performing regular scan will keep the computer out from threats.
Final Words
Protection is always better than cure. Protection of WordPress site needs hard work and time less than the work and time needed to restore and clean site once hacked. For popular site, it may result in loss of trust from visitors and search engine. Successfully implementing above points will help you to achieve security from most of the hacking techniques. You can also contribute any point, in case if we are missing any.