HTTPS is a secure version of HTTP. HTTPS (HyperText Transport Protocol Secure) adds a secure layer over HTTP protocol. Security is in deed a necessity everywhere, especially in internet. Thats why Google wants more SSL/HTTPS site on internet. Google is giving a Ranking boost to encourage webmasters to migrate from HTTP to HTTPS. However, they are not considering it as a Search Algorithm for now, but who knowns, they may consider it in future.
So, if you are planning to move your site from HTTP to SSL/HTTPS, then this may be the right time to do so. We have done the migration and everything went perfect. Now, the first question you would like to ask me and many have already asked me – Where to start and how to migrate?
The simple answer is, just Google about SSL certificate. SSL certificates are digital certificate that enable a secure connection between a server and a web browser. There are lots of SSL Certificate providers with different plans as standard SSL for single sub domain, wildcard SSL for multiple sub-domain and other plans. Get one according to your need. As applying for a SSL certificate you will need to submit a Certificate Signing Request (CSR) to the SSL certificate provider. So, next question is from where to get it?
Most webmasters are using Shared Hosting and Virtual Private Server (VPS). I will explain the steps for both.
Shared Hosting
If you are going to use third party SSL certificate(Certificate from Provider other than your Shared hosting provider) you should Ask your service provider whether they support third party SSL certificate? Also, Some shared hosting provider may ask you for extra setup charges or charges for dedicated IP address. So, it’s better to investigate before planning to install SSL certificate. If everything is fine, you can continue with installation process.
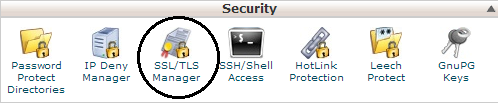
Shared hosting providers offer an amazing tool known as cpanel. So, head towards your cpanel and search for SSL/TSL Manager under security section. But, if you are going to use third party SIf you don’t find it ask it from your Hosting service provider. There you will find “Generate, view, or delete SSL certificate signing requests.” just below Certificate Signing Requests (CSR). Click on it and you will find a form.
Before filling up the form, Get all the details about your domain from whois record on internet. Enter the same details as mentioned on the whois record of your domain.
Key – Generate a 2,048 bit key
Domain – Enter the fully qualified domain name.
City/state – City/state where organization is registered.
Country – Country where organization is registered.
Company – Enter the organization name
Email – Enter your email id associated with domain name. Ex – webmaster@example.com
Passphrase – Enter a alphabetic Code.
Now, Click on generate button. CSR will be generated and will look something like –
-----BEGIN CERTIFICATE REQUEST----- Encrypted code -----END CERTIFICATE REQUEST----- |
Copy the exact code and submit to your SSL Provider, they will review the details and approve it. After approval, you will be provided a SSL certificate. Ask your SSL provider to provide a Certificate Authority Bundle/Intermediate Certificate as well. Now, Login to your cpanel and again click on SSL/TSL Manager >> Manage SSL sites [under Install and Manage SSL for your site]. If you don’t find the section, look for “Generate, view, upload, or delete SSL certificates” [under Certificates (CRT)].
Now you have 2 options. Either copy and paste the Certificate in CRT box in cpanel or copy and paste the code in a text editor and save it as domainname.crt and upload it to cpanel. Upload Certificate Authority Bundle as well. You will need a dedicated IP address for SSL certificate.
Done!! Test your site using https:// protocol. If every thing works. Congrats!!
Virtual Private Server
For Virtual private server users, i am explaining steps for Apache server with ubuntu installed. You have to login to ssh and have to activate SSL Module.
To activate SSL Module, type
sudo a2enmod ssl |
and then restart Apache.
sudo service apache2 restart |
Now make a directory where you can store the keys. For that type
sudo mkdir /etc/apache2/ssl |
Now generate Certificate Signature Request (CSR)
openssl req -new -newkey rsa:2048 -nodes -keyout /etc/apache2/ssl/domain.key -out /etc/apache2/ssl/domain.csr |
You will be asked few questions. Answer it by looking at your domain whois record.
Country Name (2 letter code): Enter 2 letter Code of your country. Ex- IN [INDIA]
State or Province Name (full name): Enter the state name.
Locality Name (eg, city): Enter City name
Organization Name (eg, company): Enter registered name of organization
Unit Name (eg, section) : Which type of your organization is?
Common Name (e.g. server FQDN): your fully qualified domain name.
Email Address: Enter your email id associated with domain name.
Your CSR will be generated and stored in /etc/apache2/ssl/domain.csr. You can open domain.csr and copy the data and send it to SSL service provider. After approval, you will be provided a SSL certificate and Certificate Authority Bundle/Intermediate Certificate. Copy the SSL certificate provided by SSL provider in a text editor and save it as domain.crt and copy the certificate Authority bundle in text editor and save it as cabundle.crt. Upload both the file in /etc/apache2/ssl/ folder.
Now, you have to edit SSL configuration file and put the required data. Type command
nano /etc/apache2/sites-available/default-ssl.conf |
You will find some code starting with <VirtualHost _default_:443>. Add the following code just above the server admin email.
ServerName example.com ServerAlias www.example.com |
Replace example.com with your domain name. Check DocumentRoot for correct path. Find these 4 lines and add
SSLEngine on SSLCertificateFile /etc/apache2/ssl/domain.crt SSLCertificateKeyFile /etc/apache2/ssl/domain.key SSLCACertificateFile /etc/apache2/ssl/cabundle.crt |
Save the file and exit.
Now enable SSL module by
sudo a2ensite default-ssl |
and restart apache server
sudo service apache2 restart |
Now, you are done! Check the https:// version of your site.
WordPress User
WordPress user have to go through few more steps. Now you can access both http and https version separately. You have to redirect your http version to https. For that you have to add few codes in your .htaccess file. Add the following code in the top of your .htaccess file.
RewriteEngine On RewriteCond %{SERVER_PORT} 80 RewriteRule ^(.*)$ https://www.example.com/$1 [R=301,L] |
The code will permanently redirect/move your site from http to https version. Replace example.com with your domain.
If you want a Secure connection in WordPress admin panel as well. Add the following code in wp-config file, just above “That’s all, stop editing! Happy blogging.”
define('FORCE_SSL_ADMIN', true); define('FORCE_SSL_LOGIN', true); |
What about SEO after changing url from http to https?
It’s obvious to have this question in mind -What about SEO and Will it affect the site?. As we have permanently moved the site to https through 301 redirection, Search engine robots will be redirected to new location. Yeah, obviously it will take some time to settle the things.
You just have to add your SSL/HTTPS version of site to Google and Bing webmaster tool. For Google Analytics, you just have to login to Analytics account. Go to Admin section, then Property setting under property section and change the default url from http to https, at last save the settings.
Problem After moving site from http to https
This not the end, you should known about the problem you are going to face after moving your site from http to https. The most common problem you will be facing is HTTPS mixed content warning. Most of the browser will not show the green signal in your https bar.
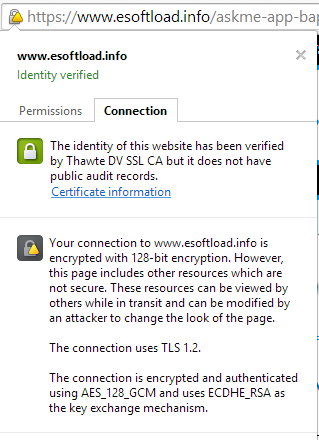
HTTPS mixed content will show a warning “Your connection to www.example.com is encrypted. However this page contains other resources which are not secure. The warning states that the https page containing non-secure (http) resource. These resources includes images, javascripts and stylesheets.
Solution
The problem can only be solved by using secure resource in every page of your site. However, the article already published may have images and links pointing to http version and all the contents are stored in database. A simple solution is to manually edit all the post and pages. You can take help of sites WhyNoPadlock. The site will help you to find insecure resources. Alternative, you can press cntrl+shift+j in Google chrome browser to activate console which will guide you about the insecure resources.
When there is a problem in WordPress, there is Plugins. Another way is to use WordPress Plugins. SSL Insecure Content Fixer and WordPress HTTPS (SSL), both Plugins will try to fix your problem. Even you can search for more plugins.
There is another way which is not recommended. Specially, until you don’t known what are you going to do. Developers can use the tool name Search-Replace -DB. Before, using the tool, take up your Database backup. You can install the tool in the server and replace the occurrence of http://www.example.com with https://www.example.com. The tool will search each occurrence of input string and replace with the desired string from database. If you are going to use the tool, delete the tool from server as soon as you finish the work. You can use the tool in your own risk.
Now, Its all Perfect, you have a new secure version of your site. Hope, the Steps will help to move your site successfully from http to https. If you have any question in your mind, I am there to discuss it in the comment section. Or if you require you can also hire me, I will set up everything for you!


Hello Anand, Thank you so much for sharing such knowledge. I’m using Godaddy VPS server for my wordpress blog. I hope this trick will really help.
Hi Anand, Very nice and informative post. It is true that HTTPS is more secure as compared to HTTP. I was looking for such type of post since long, and finally i found your article.
“Security is in deed a necessity everywhere”, your this line tells everything. the need of migration from HTTP to HTTPS. And that is the only reason why Google wants more HTTPS sites on internet.
The encryption within HTTPS is intended to provide benefits like confidentiality, integrity and identity.
I also want to migrate my site from HTTP to HTTPS, so going to try it by your way.
Thanks for sharing such a nice and valuable post with us. Your efforts are really appreciable, looking forward for some more posts by you.
Good Luck!!
Hi Anand,
Thanks for the depth of detail in this Blog post. I’ve been considering the change to HTTPS for my Blogsite for a while now. It was not the cost that deterred me but my lack of clear knowledge of what I had to do to achieve this.
Reading your Blog post has sorted this out beautifully for me.
I really appreciate your attention to detail when describing what must be filled in the form to get an SSL certificate from your hosters.
You’ve taken a great deal of trouble to describe how to get an SSL certificate for both Shared hosting and VPS. I use a VPS for my website and I found this input really helpful.
The additional content describing the kind of issues one will face and the solution one must apply when transiting from HTTP to HTTPS helped me make a decision to go ahead with changing over from HTTP to HTTPS for my website.
Great job. Thank you so much for sharing this.
Warmly,
Ivan Bayross
Hi Anand,
Thanks for sharing this tutorial. I was planning to hire someone to migrate my protocol but now I think I can do it myself.