While talking about the best email service, Gmail is the only app that comes first in our mind. Google’s Gmail service is one of the most popular platforms around the world for sending emails and documents. It is one of the simplest and easiest email services compare to Yahoo, Outlook, and other email service providers.
There are some hidden features of this email service that you may not hear before. Hence, we will share you top Gmail tips & tricks to explore your Gmail experience. Cool Gmail Tips & Tricks.
#1: Undo Send Emails
After hitting send button, you realize that the email content is improper. Do not feel regret! Here’s the solution.
Step 1: Turn on Undo Send by heading to Gmail account >> Settings >> Enable Undo Send under the General tab.
Step 2: Under the “Send Cancellation Period”, set the time period you want to unsent an email. You can set a maximum limit up to 30 seconds.

Step 3: Click on Save Change at the bottom of the page.
Once you have enabled Undo Send emails option, you will be to cancel the send mail by clicking Undo at the top of the page.
#2: Send Encrypted Email
If you are a professional, then you must use an encrypted email feature of Gmail to send end-to-end encrypted emails for securing confidential or sensitive data. This feature is handy for higher level business authority or Government data to protect their data from online hackers. To send encrypted emails on Gmail, you need to add the Encrypt Gmail extension to Chrome and open Gmail. You will see the encrypted option while sending the emails. When you hit a Send Encrypted button, you will be prompted to enter the Encrypted Password which will be needed by the receiver to decrypt the email. Once the receiver got the mail, a receiver has to get into the password to see the email.
#3: Read Gmail in Offline Mode
Sometimes it happens when you don’t have the internet connection, but you still have to open an important email. Then, what will you do? Luckily, Google allows you to read emails in offline mode. All you have to do is add the Gmail Offline Chrome extension by heading to Gmail settings >> Offline tab >> Click on Install Gmail Offline. Once you installed the Gmail Offline, let the extension to sync all emails for Offline viewing. That’s it!
#4: Mute Unwanted Threads
Unwanted threads are one of the irritating factors in Gmail. If you got tired of persist unwanted emails from the number of threads then you can mute it by selecting the email and click More option and then hit the Mute option to silent those unwanted emails.
#5: Send Emails from Another Email IDs
You may not be aware of this fantastic feature of Gmail. With the help of this feature, you can send emails from multiple other accounts right from the Gmail account without opening the other individual Gmail accounts. You just need to follow below steps:
Step 1: Go to Settings >> Account and Import
Step 2: Under Sen email As click on “Add Another email address” and complete the procedure of adding email.
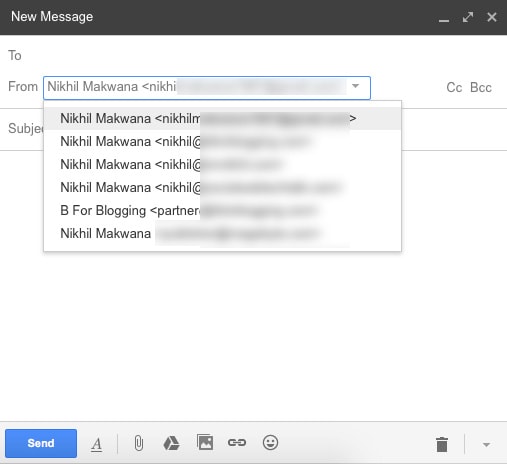
Step 3: Now compose a new email and you will find a drop down box in From tab. Select the email address from which you want to send and email.
#6: Schedule and Track Emails
If you are planning a vacation and want to set up an email schedule for a weekend, then you can set a schedule and track your emails with Gmail by Boomerang Plugin. This plugin helps you to schedule emails and send emails at the same time and date that you have fixed. It also sends you an alert when the recipient got your email.
#7: Advanced Search
Sometimes we forget some emails details. Thus the Google’s Gmail service allows you track the email with the help of Advanced Search. If you want to find any past mail, but you don’t have more detail about that email, then you can use Advanced Search. You just need to click on the gray drop-down arrow next to the search box. When you click on that arrow, you receive pop-pop ask you fill detail about the email like From, To, Subject, Has the words, Has attachment, Size, and date of the email you have been searching for. As per you data, Gmail will bring you result of some emails. You can open the email that you are searching for.
#8: Vacation Auto-Reply Mode
Just like Boomerang Plugin, you can use this Vacation responder feature to set up an automatic reply for specific emails if you are going out of town for few days. For that, you need to turn on the Vacation responder mode and set a short, specific reply template to send as an automatic reply to your emails.
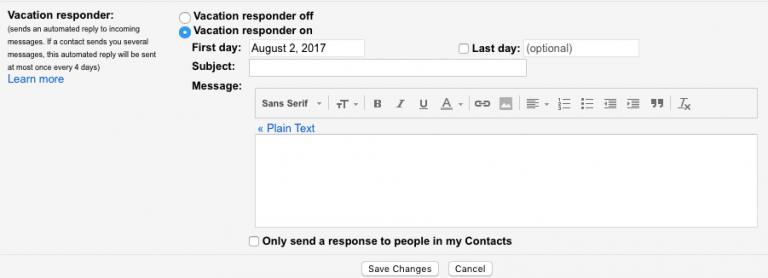
To activate Vacation responder, go to Settings ? General and then scroll down to the Vacation responder and turn it on. Enter message, subject and set a date for automatic response. Once you have entered all things, just click on Save Change. That’s it!
#9: Turn on Personal Level Indicator
The Personal Level Indicator can help you know whether the email sent only to you or a group of people or complete mailing list. This will be very helpful to know the senders’ attention. If you want to turn on the Personal Level Indicator.
Go to Gmail Settings >> General tab and scroll down to Personal Level Indicator and enable it.

When you see single arrow (>), it means the email is was sent to you and group of people. Double arrow (>>) means the mail was only sent to you and no arrow means that email was sent to the mailing list.
#10: Add a Beautiful Theme
If you don’t like the default Gmail inbox theme, then you can change the inbox theme and background by heading to Gmail Settings and then choose Theme. There are some beautiful themes are available; you can choose from the available theme or upload your theme as per your desire.
#11: Share Gmail Account without Password Sharing
In some cases, it happens that you cannot handle and respond back to few emails. In that Gmail offers a unique feature to share access to your Gmail without sharing a password. You can share you Gmail access to the trusted person with a few clicks. To do that follow below steps.
Step 1: Navigate to Gmail Settings
Step 2: Select Account and Import Settings
Step 3: Under “Grant Access to your Account” click on Add another account.

Step 4: Enter an email address to whom you want to grant access of your Gmail.
Step 5: Next, click on the button “Send Email to Gran Access”.
You are done. The recipient will have to verify the same and then after He/She can access your Gmail Account with the password.
Well, we hope that these Gmail tricks and tips help you to lift up your way to use Gmail account. Stay tuned for more tech tips and tricks.
This Article is contributed by Suraj Padmasali, a fitness freak who has a serious fan following on almost all social media platforms. At MegeByte.com, he contributes to the social media section along with tips and tricks for Windows.


